Category: Identification and Expertizing

Identifying Hard and Soft Paper

Hard White Paper
The “hard white” paper was a rag content paper used by both the National and Continental Bank Note Companies (#134-181).  This is sometimes referred to as a thin to thick white wove paper on the 1870 to 1873 printings, and a yellowish wove paper on the 1875 printings.

Soft Porous Paper
The “soft porous” paper was a wood pulp paper used by the Continental Bank Note Company briefly in late 1878 to early 1879, and by the American Bank Note Company for all 1879 and later printings (#182-218).  Because the American Bank Note Company took over the Continental Bank Note Company in 1879, including plates, paper and finished stamps, the soft porous paper is generally attributed to American Bank Note printings.  All stamps issued between 1879 and 1894 were printed by the American Bank Note Company on this paper.
The “hard white” paper was a rag content paper used by both the National and Continental Bank Note Companies (#134-181).  This is sometimes referred to as a thin to thick white wove paper on the 1870 to 1873 printings, and a yellowish wove paper on the 1875 printings.

Identification
There are two methods to identify the paper type, and occasionally it may be necessary to use both methods since one type of paper may show characteristics of the other type.  To learn the paper types, it is easiest to begin with stamps of a known paper type.  Any grilled issue and any stamp from the 1869 series will be on thin hard paper, while the 1890 Small Bank Note stamps and the Columbians will be on soft porous paper.

Easiest Method: The Flick Test
The traditional test is to flick the stamp close to your ear.  Hold the stamp between your thumb and index finger, leaving about a half an inch protruding, and snap the stamp back and forth with the flick of a finger.  Hard paper gives a sharp, loud sound, while soft paper gives a duller, less audible sound.  However, this test is not terribly accurate and care must be taken to not damage the stamp.

More Accurate Method: Examination Under a Strong Light
Hold the stamp up to a strong light and examine a clear portion of the stamp, such as the margins, at various angles.  The hard paper is translucent and has an even texture throughout, and is usually white.  The soft paper appears mottled and opaque, with fibers typically bunched in a screen or mesh pattern, and is usually yellowish.  Also, when viewed from the back, the design tends to show through on the hard paper.

Thin hard paperSoft porous paper
thin hard papersoft porous paper

Source: Kenmore Stamp Company

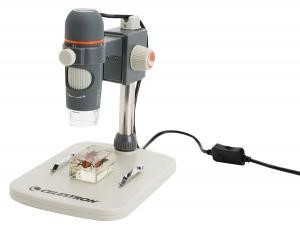
Stamp Magnifying Microscope

Do you have a computer and are you tired of struggling with a magnifying glass to identify your stamps??   Well maybe it’s time to update with some technology.  Having worked most of my adult life in the IT field (yes, I am a geek) it seemed only right that I should look to technology to help my stamp collecting addiction.  So last year I purchased a Celestron 5MP Digital Microscope Pro (currently $104 on Amazon) to help me identify stamps.  This week I got an email with a review by PhilaSupplies on the digital microscope I had purchased last year and I thought I’d share with the club some of my thoughts on their review and what I did to overcome a major short coming I felt there was with the product.

PhilaSupplies says: This stamp magnifying microscope is setting a new standard for stamp collectors. It´s an easy-to-use microscope, perfect for viewing stamps, coins, and other small objects at magnifications up to 200x! This stamp magnifying microscope is extremely versatile – you can use it in handheld mode to view large object surfaces and access tight spaces or just use the included adjustable stand for smaller objects. View the images from the Handheld Digital Microscope Pro directly on your PC using the provided software, and save the 5MP images or 30fps video to your hard drive!

Read the full review: https://philasupplies.com/stamp-magnifying-microscope-celestron-5-mp-handheld-digital-microscope-pro-review/

In general, I agree with the review, but I do however disagree with the claim that it is useful in the handheld mode. I personally am too shaky to hold it steady in one hand and use a mouse to capture a good image in the other.  My microscope didn’t come with a USB cord that has a shutter in the cable which may help resolve my issue. Since I didn’t have the shutter on the cable, I had to come up with something that worked for me. 

I found a very simple and inexpensive fix to the problem.  The stand comes with a very nice, although too short, 0.625” OD (5/8”) polished stainless-steel rod to which the microscope mounts and is perfectly adequate for very tight and detailed viewing.  If, however, you want to capture an entire stamp larger than a Washington/Franklin, the rod is not long enough.  I tried spinning the microscope around 180 degrees on the rod and setting the base on books to elevate it but that was awkward and unstable.

Replacing the short rod was needed to fix the problem, I had originally started looking for a piece of stainless-steel tubing to replace the short piece provided but quickly found it was going to be quite expensive.  A 24” piece of 304 polished stainless-steel tube was going to run $35 or more.  So rather than spend money on a stainless-steel tube that I’d rather spend on stamps (of course), I opted for a hardwood dowel rod. I found that a 16” length of 5/8” Poplar dowel rod replaces the original tube just fine by simply removing the original rod by loosening the retaining ring and removing from the base (figure 1).  This eliminated the need to hand hold the microscope for larger/entire stamps (figure 2) while still very useful up close as well (figure 3).  A 48” piece of 5/8” Poplar dowel rod cost less than $3 at Lowe’s.  I assume that if I were to use it a lot the wood would eventually wear down and need to be replaced but this is still a far cheaper approach than buying stainless steel tubing and for the $3 I spent I already have left over dowel rod for 2 replacements.  If money is not an issue then go for the polished stainless-steel, but for occasional use the wood works just fine.

In summary, with the above exception I would agree with the final verdict of the review that was posted on PhilaSuppiles, that if you are wanting a microscope for examining your stamps the Celestron 5MP Digital Microscope Pro is one to put on your list!

Grading Stamps

Stamp grades range from “average” all the way to “gem”. Grades are based on three factors: centering, condition, and eye appeal. Centering means determining how well a stamp’s design is centered within its perforations. A well centered stamp has equal sized margins, while a poorly centered stamp has margins of unequal size. Well centered stamps command a higher grade (and price) than poorly centered stamps. If a stamp is in perfect condition, grades are directly proportional to the stamp’s centering. So let’s say you have two stamps, both in perfect condition. The first stamp is well centered, and thus has a high grade, while the second stamp is poorly centered and thus has a low grade. The first stamp could be worth approximately 10-100 times as much as the second stamp because the demand for well centered stamps is so high.

Checkout these references:

Introduction to Grading Stamps

How to Grade Stamps Yourself