
Sonic Imagery Labs
Current version: 5.2
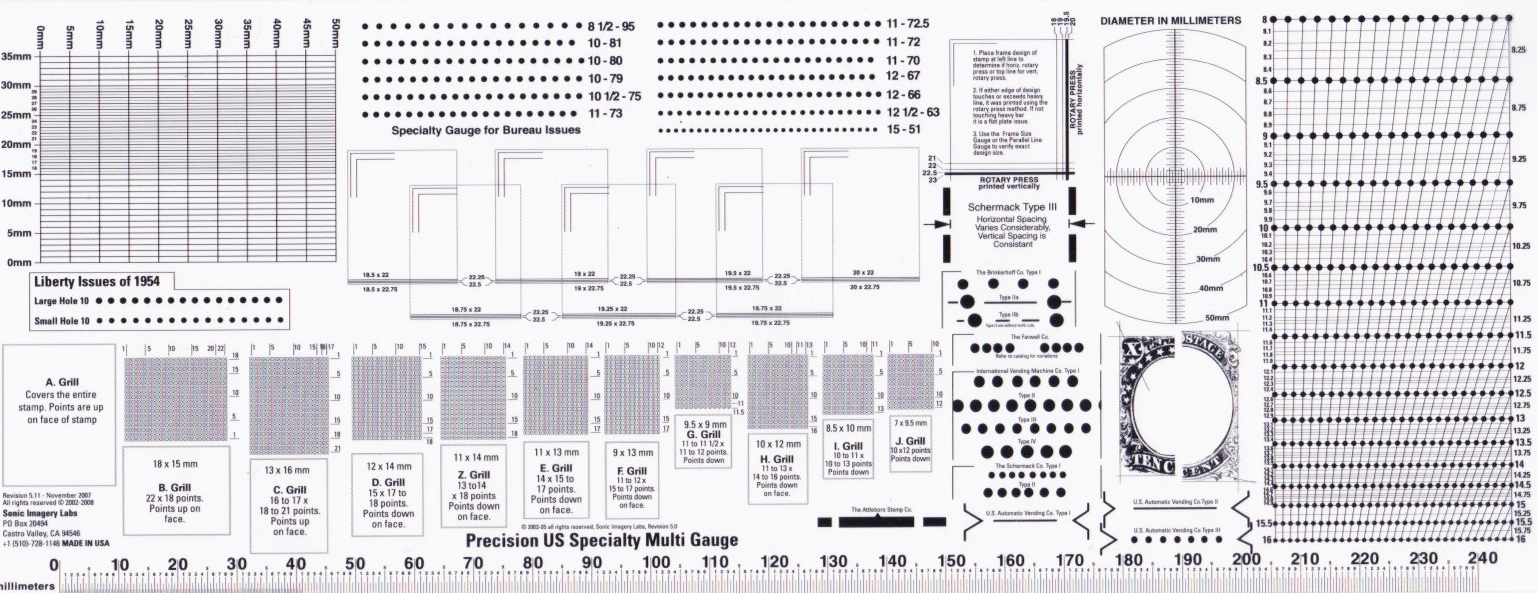
The Sonic Imagery Labs Precision U.S. Specialty Multi Gauge combines 12 precision measuring devices in one easy to use instrument. This gauge has been expressly created for US stamp collectors but can be used were applicable. Since the gauge is hydraulically laminated clear material, it can be used to measure stamps on cover, in sheets, or mounted in albums. For measuring loose stamps, one will also find it beneficial to place the stamp to be measured on top of the gauge with the gauge on a lightly colored background. The lamination process also insures that the gauge itself will not shrink due to heat or aging. This proprietary process guarantees accurate measurements and prevents the design elements from being scratched off.
Available locally from Stamps Plus
This multi-gauge has the features that other multi-gauges do not. The Precision U.S. Specialized Multi-Gauge is the essential tool for any collector interested in U.S. stamps from the Classics through the Liberty Issue of 1954. The gauge now contains 12 precision measuring devices beginning with a Specialty Perf Gauge based on the Kiusalas Specialist Gauge (#1). For collectors of the Grilled Issues, there are two useful gauges: the Grill Pattern Gauge (#4), used to determine the grill type of a stamp, and the Grill Size Gauge (#5), which is used to determine the size of the grill. The Parallel Line Millimeter Gauge (#7) is used to measure the width or height of coil stamps, as well as the parallel accuracy of coil cuts and edges. For collectors of Flat Press/Rotary Press issues, the Design Size Millimeter Gauge will quickly measure the size of the frame design of these stamps, while the Rotary/Flat Press Gauge (#9) is the quickest way to determine what press was used to print a stamp. The Schermack Private Perforation Gauge (#10) accurately reflects the vertical height of Schermack Type III perforations. The Large and Small Hole Perf 10 issues of the Liberty Series (#6) can easily be distinguished using this measuring device. A Standard Perf Gauge, which measures to the nearest tenth of a perf; a Cancellation Diameter Gauge (#5) and an enlarged 240mm long Millimeter Scale (#11) are the final three devices on the gauge. The grill points in the Grill Pattern Gauge (#12) have been lightened, to allow users to better see through the gauge. This new gauge also features improved lamination that will keep the printed image from scratching off, and prevent shrinkage due to age and temperature. It is a revised edition and quantity dealer inquiries are welcome. Includes a protective slipcover shown and a colored “contrasting backround card” to aid in measurements. The back of the slip cover has a summary of the instructions and feature description shown below. You can also download a PDF instruction sheet here. The slipcover is made from glossy 90 lb. card stock. The multi-gauge itself is made of durable hydraulically laminated clear TVC ANSI-X35d spec temperature stable plastic and measures 10.4 x 3.9 inches and is 0.0095 inches (9mils) thick. FEATURES:
1. Specialty Perforation Gauge, Bureau Issues: Used to determine the perforation measurement of a stamp (number of teeth or holes per two centimeters). It has various settings for perforations commonly believed to be the same. For example, there are three “perf-10” measurements possible, 10-79, 10-80 and 10-81. The first # listed is the closest perforation. The second number refers to the spacing between holes in thousandths of an inch. The size of the dots printed on the gauge match the diameter of the pins used to cut the perforations. The match should be exact along the entire length of the side being examined.

2. Standard Analog Perforation Gauge: Used to determine the perforation measurement of a stamp (number of teeth or holes per two centimeters). If all perforations align on the horizontal dots, that’s the precise perforation. If the point of alignment falls between the dots, the stamp has a fractional measurement.

3. Grill Pattern Gauge: For United States Issues of 1867 to 1871. Grill Pattern Gauge is used to determine the grill type of a stamp. It is important to understand and determine the correct grill type, as many issues have several grill variants. For example, the 3 cent Washington issue of 1861 (Scott 64 and 65), was printed again in 1867 and can be found with 7 grill variations. The grill classifications can be determined by the size of the grilled pattern, the shape of the grill point and which side of the stamp the apex of the point appears.
4. Go/No-Go Grill Size Gauge: Many of the later grill patterns are faint and can be hard to see. By examining the stamp with a bright light source at an extreme angle, one can use the go/no-go portion of the gauge to determine the correct classification of grill.

5. Cancellation Diameter Gauge: Used to measure the diameter of circles, date stamps, and any other marking or detail, which are traditionally scaled in millimeters. Place the scale over the object of interest until it is centered within the rings. Then read scale. Rings are at 10 mm increments. Major divisions are 1 mm and minor divisions are 0.5 mm.

6. Liberty Issues of 1954: Used to measure and differentiate between the large hole and small hole perforation 10 varieties of this series.

7. Parallel Line Millimeter Gauge
is used for accurately measuring the height or width of coil stamps. It is also useful for verifying the parallel accuracy of coil cuts and edges as well as perforation spacing across perforation rows. This is typically used under 10-30X magnification. Accurate readings require a consistent technique. The edge of the stamp being measured can be placed at the “0” mark of the scale in three different positions: 1. The edge of the design flush with the left side of the “0” marker. 2. The edge of the design flush with the in the center of the “0” marker. 3. The edge of the design flush with the right side of the “0” marker. How one begins, technically makes no difference. What is important is how the final reading is taken. It must be consistent with how the scale was positioned at the start.

8. Go/No-Go Frame Size Millimeter Gauge: Used for quickly measuring the height and width of a stamps frame design. The gauges line width is 0.10 mm and is helpful for determining the direction and ratio of paper shrinkage if present. It is graduated in 0.25 mm increments for the most common design sizes of the bureau era.

9. Go/No-Go Rotary / Flat Plate Press Gauge: Quickly determines if the stamp was printed using the Flat Plate Press or Vertical /Horizontal Rotary Plate Press. Make all measurements under 5 – 20X magnification. Simply follow the instructions on the gauge. This is typically the 1st approximation and specialists then measure the stamp using the Go/No-Go Design Size Millimeter Gauge.

10. Vending and Affixing Machine Perforation Identifier: Also called “private perfs”. Coverage of the Vending and Affixing Machine Perforation Identifier has been expanded to include The Attleboro Stamp Co., The Brinkerhoff Co. (Types I, IIa, IIb), The Farwell Co. (Types A-B), Mailometer Co. (Types I-V), The Schermack Co. (Types I-III) and US Automatic Vending Co. (Types I-III). Measurements of many Schermack Type III perforations show that horizontal spacing varies considerably. The average horizontal centering is about 20 mm. While their horizontal spacing varies, their vertical dimensions remain fixed.

11. Standard Millimeter Scale: Linear measurements up to 240mm. Major divisions are 1 mm and minor divisions are 0.5 mm. As stated earlier, accurate readings require a consistent technique. The edge of the stamp being measured can be placed at the “0” mark of the scale in three different positions: 1. The edge of the design flush with the left side of the “0” marker. 2. The edge of the design flush with the in the center of the “0” marker. 3. The edge of the design flush with the right side of the “0” marker. How one begins, technically makes no difference. What is important is how the final reading is taken. It must be consistent with how the scale was positioned at the start.

12. Guide Dot Locator: Platers and Specialists of these issues can locate the relative position of the guide dot for classification.
